
Adobe Dimension for macOS

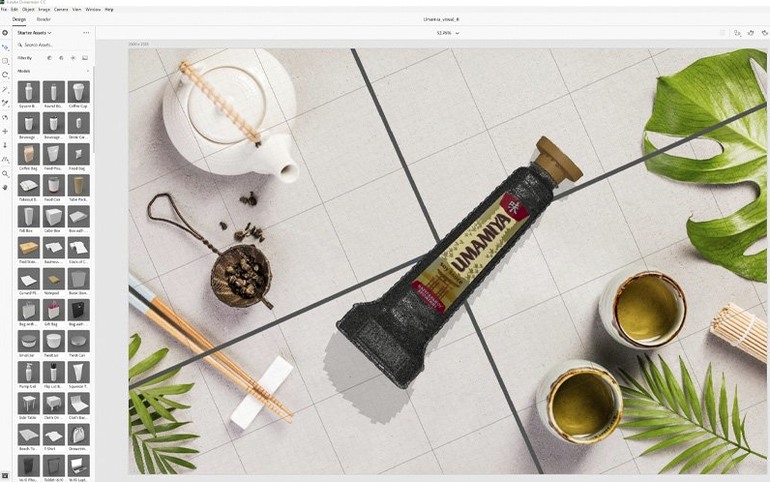
The Render Preview window is half the reason to stay in the app instead of jumping out to a full CPU render. I dial in lighting and materials, see a noisy-but-fast preview update, and only commit to the final ray-traced frame when the composition actually looks right.
Where do the 3D models come from?
The built-in starter assets are fine for a first pass, but real work usually starts with Adobe Stock. Models tagged as optimized for Dimension import with correct materials and relative scale, so you skip the first thirty minutes of fixing broken normals.
Why a decal hugs the surface instead of floating like a sticker
Place the vector or image as a decal layer on the model. Dimension projects it along the surface normal and respects the underlying material roughness, so the graphic doesn't float in space like a sticker on glass unless you want it to.
What does the Photoshop handoff actually look like?
Export as a layered PSD and every object, shadow, and reflection sits on its own layer with masks intact. The file lands in Photoshop ready for final color grading and compositing without re-rendering anything from scratch.
How does Dimension compare to Blender, KeyShot, and SketchUp?
Dimension sits in a narrow lane and does not try to be everything. Blender is the open-source Swiss Army knife: modeling, sculpting, animation, physics, compositing. It can produce scenes Dimension cannot dream of, but getting a product mockup to look right in Blender means learning a UI that treats you like a VFX artist. Dimension skips all of that and hands you a staging environment where the render engine guesses what you meant. The trade is real: you give up custom shader graphs and rigging, and in return you get a match-lighting-and-background button that works.
KeyShot competes more directly. Both aim at product visualization with physically based rendering and a shallow learning curve. KeyShot wins on material precision — its subsurface scattering and anisotropic reflections are a step above — and it imports CAD data natively, which Dimension does not. Dimension's advantage is the Adobe ecosystem handshake: the PSD export with named layers, the direct Stock panel, the way Illustrator artwork lands on a model without format negotiation. If your workflow ends in Photoshop, Dimension cuts out two round-trips.
SketchUp is a different animal. It is a conceptual design tool, great for blocking out spaces and furniture, but its native renderer looks like a video game from 2006. You can bolt on V-Ray, but now you are managing two tools. Dimension starts where SketchUp stops: the scene is built, now make it look like a photograph. A designer who blocks a retail display in SketchUp can bring the geometry into Dimension for materials and final rendering without ever opening a UV editor.
Drag in a glass-and-metal stock model before you see an empty scene
Do not open a blank document and stare at the ground plane. That is the fastest way to think the app has nothing to offer. Instead:
- Drag in a Stock model immediately. Pick something with glass and metal — a bottle, a tumbler, a watch — so you see the material system respond to the default environment light. Rotate around it. The first "oh, that looks real" moment usually happens in the first three minutes with the right model.
- Swap the environment. The lighting and background are one image in Dimension's logic. Pull a different HDRI from the starter library or drop in your own
.exror.hdrfile. Watch how the reflections change on curved surfaces. This single step teaches more about the renderer than reading any documentation. - Place a graphic on a model. Import a logo as a
.aior.psdfile, drag it onto a model, and switch the placement mode from "decal" to "fill." The difference between the two modes determines whether the artwork wraps the surface or sits as a flat label, and understanding this early prevents a lot of rework later. - Export a layered PSD once. Even a throwaway scene. Open it in Photoshop and click through the layer stack. Seeing how Dimension names every shadow catcher, reflection pass, and object mask builds trust in the round-trip before a deadline is on the line.
Why your viewport shadows and reflections look better after rendering
Treating the render preview as the final image. The viewport uses a fast approximation: shadows are softer, reflections are lower-resolution, and transparency stacks only a few layers deep. I have watched designers tweak a scene for an hour complaining that the glass looks milky, when the problem was simply that the interactive preview does not trace enough bounces. Hit the render button before judging materials.
Ignoring object scale. Dimension is physically based, which means a wine bottle modeled at fifty meters tall will refract light like a glass skyscraper. Stock models tagged for Dimension handle this automatically, but geometry from other sources often arrives at absurd real-world sizes. Check the scale in the Properties panel before you waste time adjusting roughness and index of refraction on something the engine sees as building-sized.
Using the wrong ground plane mode. The default ground catches shadows and reflections, but it is infinite. Place a model near the edge of a table surface and the shadow extends forever into the void unless you switch to a match-image ground or add a real floor plane. Beginners often stack objects on a floating platform without realizing the ground plane is not a real surface.
Overloading a scene with high-poly models. A single optimized Stock model renders quickly. Three, plus a background environment rendered at full resolution, and the app starts swapping to disk on an Intel Mac with integrated graphics. Build your hero object first, lock its materials, then bring in supporting elements one at a time.
From Illustrator label to coffee-bag mockup in a single morning
Tuesday morning, a packaging designer needs a mockup of a new coffee bag for a client pitch. The Illustrator file with the label artwork is ready; the bag model came from a Stock search inside Dimension.
She opens the app and drags the bag model onto the canvas. The default studio environment lights it from above with a soft key, slightly warm. She spins the bag to a three-quarter angle — enough to show the front panel and a sliver of the side gusset — and drops the Illustrator file directly onto the front face. Dimension places it as a decal, respecting the slight curvature of the filled bag. She nudges the artwork down six millimeters with the arrow keys, watching the real-time preview update.
The bag material is matte kraft paper, but the default is too smooth. She opens the material properties, drops the roughness slider to 0.7, and adds a subtle bump map from the starter textures. The side gusset catches a rim light from the environment; she rotates the HDRI twenty degrees to put that highlight exactly on the edge fold, separating the bag from the dark background.
She adds a second object: a single coffee bean, scaled up to sit in the foreground, slightly out of focus if depth of field cooperates. The bean model uses a material with subsurface scattering turned on, so the light wraps around its edges instead of cutting a hard rim.
Time to render. She sets the output to 3000 by 3000 pixels, switches the renderer to final quality, and lets the Intel Mac chew through the ray bounces for about twelve minutes. While it runs, she opens Photoshop and preps the background layer she will swap in later — a warm kitchen counter shot from a previous shoot.
The render finishes. She exports as a PSD, opens it, and sees the bag on one layer, the coffee bean on another, the shadow passes as separate multiply layers. She drops in the kitchen background, adjusts the hue of the shadow layer to match the warm wood tones, and saves out a comp that looks like a photograph taken on a countertop that morning.
Total time from blank canvas to client-ready image: under forty minutes. No UV unwrapping, no node editor, no render-farm queue. Just a designer making a thing look real.
- Patched security vulnerabilities in the 4.1.7 release.
- macOS 11 or later
- Intel processor
$ man adobe-dimension | grep -A2 "?"
Can I use my own 3d models for Adobe Dimension?
Yes. The app imports.OBJ, .FBX, .GLB, and .glTF files. Models from Adobe Stock that carry the Dimension-optimized tag will match the scene scale and material system automatically.
Does Dimension still get updates?
Adobe lists Dimension 4.1.7 as a supported product receiving technical and security patches. The January 2026 release resolved identified security vulnerabilities.
Comments 0
Sign in or create an account to leave a comment.
No comments yet. A codec, a slice, a machine — they appear after moderation.