

iZotope Nectar for macOS
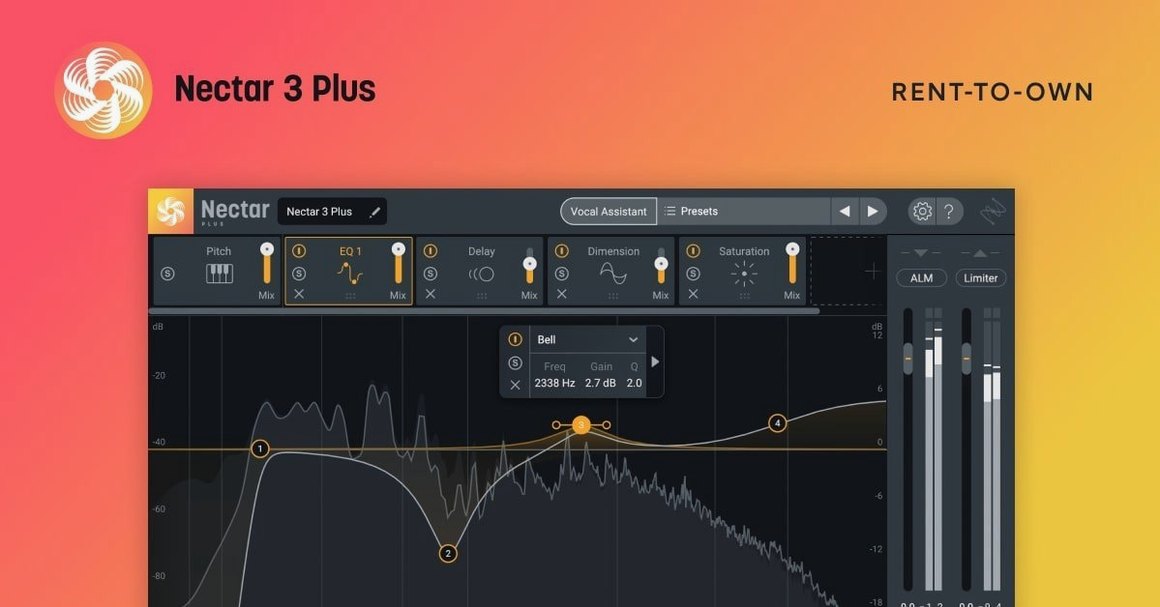
A rough vocal take lands in your DAW — maybe it’s breathy, uneven, and missing the thickness you heard in the room. You drop Nectar 4 onto the channel strip and let the Assistant listen for a few seconds. It maps out the problems and builds a starting chain from the modules inside, giving you a processed signal you can tweak rather than build from scratch.
Clean up the raw take
Breath Control and the de-esser work alongside your usual channel-strip EQ without fighting for CPU. Nectar reads the audio and targets only the noise, so you are not stacking three separate plugins to do one cleanup job.
Shape a pocket around the vocal
Auto-Level (Advanced edition) rides the fader before compression ever kicks in, handing a stable signal to the dynamics module. Voices and Backer let you generate harmonies or double-track layers directly on the track, which means you can skip routing to a separate bus for a quick stacked sound.
Hand off to your finishing chain
Once the vocal sits right, Nectar slots into a larger workflow. You can send its output into ValhallaVintageVerb for space, or print the processed take and edit it in Melodyne. The plugin loads as AU, VST3, or AAX, so it appears wherever your other tools live.
What questions do people ask before they install Nectar 4?
A few things come up over and over in forums and group chats. First: does it run natively on Apple Silicon, or is it stuck in Rosetta? As of version 4.1.0, the plugin ships as a universal binary — ARM and x86-64 code sit inside the same bundle, so Logic Pro and Ableton Live load it directly without translation. The minimum bar moved to macOS Ventura 13.7.4 with this update, which means older machines running Catalina or Big Sur need to stay on an earlier build or skip this release.
Second: what is the difference between the three editions, really? Elements gives you the Vocal Assistant, basic EQ, compression, de-essing, and a few creative effects. Standard adds Voices for harmony generation, Backer for layered doubles, and more module slots in the chain. Advanced unlocks Auto‑Level, full control over the internal routing order, and per‑band processing inside individual modules. If you mainly clean up podcast dialogue, Elements is usually enough. If you stack vocal arrangements and need consistent level before compression, Advanced earns its keep fast.
Third: does it phone home or require a permanent internet connection? The authorization mechanism changed a few times across versions. The 4.1.0 release uses iLok, but it does not demand a constant connection once activated. The .dmg package includes an activation guide that walks through the offline steps if your studio machine is air‑gapped.
A first session, step by step
You open a project from last week — three lead vocal takes, one double, and a room mic that is mostly chair squeaks. The lead channel has a raw clip that swings between whispered verses and a belted chorus. You insert Nectar 4 as the first plugin on the lead track. The interface opens with the Vocal Assistant panel front and center. You hit Listen, play back a section that covers both quiet and loud parts, and wait maybe eight seconds. The assistant returns a custom chain: a gentle high‑pass filter, a compressor with a slow attack to keep transients, a de‑esser catching sibilance around 7 kHz, and a touch of plate reverb from the Dimension module.
You mute the reverb to hear what is actually fixed. The breath noises between lines are still there, so you open Breath Control and pull the threshold down until the blue reduction meter only jumps during the inhales. The processed signal sounds cleaner, but the chorus still jumps out too loud relative to the verse. On an Advanced install you would engage Auto‑Level and set a target of −18 dBFS, but you are on Standard today, so you dial the compressor ratio from 3:1 to 4:1 and lower the threshold a hair. The vocal sits.
For the double track, you want something wider and slightly detuned. Instead of duplicating clips and nudging them by hand, you load a second Nectar 4 instance and open the Backer module. You set one voice panned hard left with 11 cents of detune and a 15 ms delay, then a second voice hard right with −9 cents and 22 ms. The faders on the module let you blend the doubles underneath the dry signal, so you pull them back until they add weight without reading as obvious layers. The room mic gets a third instance — just the gate and EQ modules, nothing fancy — and the session sounds like a vocal booth instead of a living room.
A real task from start to finish: podcast dialogue cleanup
You have a forty‑minute interview recorded in a kitchen. The guest sat too far from the mic, the fridge hums at 120 Hz, and there are sudden loud laughs that clip the recorder. You drop the file into Reaper, split it into phrases on one track, and insert Nectar 4.
The Assistant analyzes a quiet section first and immediately notches the fridge hum — you can see the EQ curve pulling down a narrow band at 120 Hz with a second harmonic cut at 240 Hz. You widen the Q slightly because the compressor was not catching the hum modulation. For the guest track, you duplicate the Nectar instance and run the Assistant on that clip separately; it applies more make‑up gain and a softer compression knee because the input level is lower. The two chains now match loudness without sharing settings.
The loud laughs still clip. Nectar does not replace a de‑clipper, so you insert a simple clip‑fix plugin before it in the chain. After that, the compressor module in Nectar catches the remaining peaks with a fast attack and brings the RMS level up into a broadcast‑safe range. The Dimension module adds a very short room ambience — just 8% wet — so the kitchen does not sound completely dead. You bounce the track, and the file is ready for the editor without further gain‑riding.
What did version 4.1.0 change in everyday use?
The most obvious practical shift is the macOS version floor. If your studio machine was parked on Monterey or Big Sur, you cannot install this update. The jump to Ventura 13.7.4 means the plugin now expects Metal‑capable graphics handling for the GUI, which runs smoother on scaled Retina displays but leaves older hardware behind.
Windows users gained proper HiDPI support, so the interface no longer looks soft on 4K monitors. For Mac users, the bigger news is the iLok authorization fix. Earlier Nectar Standard builds occasionally refused to recognize a valid iLok license after a system reboot; the 4.1.0 point release patches that behavior. If you had been force‑quitting the DAW and re‑inserting the plugin as a workaround, that step disappears.
The supported DAW and NLE list also shifted. The developer dropped formal testing on some older Pro Tools versions, so if you work in a studio locked to a legacy Pro Tools build for hardware compatibility, you will want to check the readme inside the .dmg before updating. No new modules or sound changes arrived in this release — it is a compatibility and stability update, not a feature drop.
Pick the assistant EQ that matches most of the performance
- Run the Assistant on several sections before you commit. A quiet verse and a loud chorus will produce different EQ suggestions. Pick the one that matches the majority of the performance, then tweak manually for the outliers.
- Save your own starting chains. Once you dial in a gate, de‑esser, and compressor that work for your voice and mic, store it as a user preset. The Assistant is fast, but a known‑good starting point saves re‑analysis time on every project.
- Watch the Auto‑Level timing if you are on Advanced. The default 50 ms look‑ahead can soften consonants too much on fast rap or spoken‑word passages. Shorten it to 10–15 ms and let the compressor handle the remaining transients.
- Voices and Backer eat CPU proportionally to voice count. Four harmony voices plus three Backer layers on the same instance can choke a busy session. Spread heavy generative modules across separate Nectar instances, or freeze the generated layers to audio once you are happy with the arrangement.
- Check the output gain staging after adding modules. Nectar does not auto‑compensate level across the chain, so enabling Backer or Dimension can bump the output by several dB without an obvious clip light. Keep a loudness meter after the plugin until you learn how your chain sums.
- Windows HiDPI support added for sharper interface rendering on high-resolution displays.
- Fixed an iLok authorization failure that affected Nectar Standard installations.
- Updated supported DAW and NLE host versions.
- Minimum macOS requirement raised to macOS Ventura 13.7.4.
- macOS Ventura 13.7.4 or later
- Intel or Apple Silicon Mac (64-bit host)
- AU, VST3, or AAX compatible DAW
Comments 0
Sign in or create an account to leave a comment.
No comments yet. A codec, a slice, a machine — they appear after moderation.
More in VST Plugins
cd ../ iZotope Neutron
VST Plugins 928 MB
 iZotope Insight
VST Plugins
 iZotope RX
VST Plugins 3.6 GB Updated
 iZotope Tonal Balance Control
VST Plugins 264 MB
 Kalifornia Dynamic KD Alkane
VST Plugins 270 MB
 kiloHearts Ultimate & Slate Digital Bundle
VST Plugins 4.9 GB
 Komplete FX Bundle
VST Plugins 3.2 GB
 Komplete Kontrol
VST Plugins 785 MB