Imagenomic Portraiture for macOS
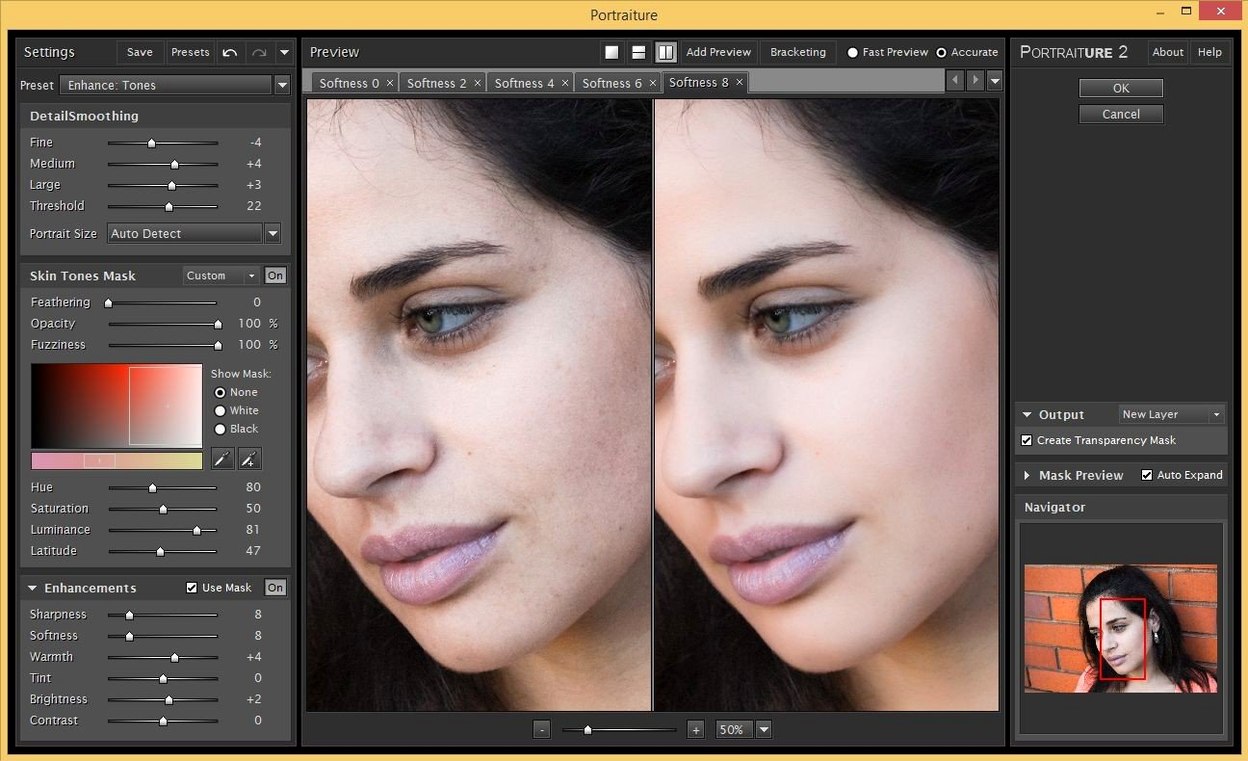
If you've ever built up a frequency separation stack in Photoshop, you know the tedious part isn't setting up the layers—it's painting the mask for the high-frequency texture layer. Portraiture replaces that manual selective masking step entirely. It works as a standard plugin from the Filter menu, applied directly to a pixel layer or a Smart Object for non-destructive passes.
Workflow placement
- Cleanup layers first. Clone out temporary blemishes and stray hairs on a blank layer so the plugin works with clean source pixels.
- Stamp a merged copy (
Cmd+Shift+Opt+E) at the top of the stack. This is the layer you run Portraiture on. - Convert to Smart Object before opening the plugin. The filter applies as a Smart Filter, so you can double-click its entry in the Layers panel later and tweak the smoothing without recomputing from scratch.
- Mask by feature, not by skin. The plugin's built-in masking is automatic, but after applying, add a black layer mask and paint white only over skin areas.
- Blend at reduced opacity. Switch the filtered layer's blend mode back to Normal and drop opacity to 80–90%. This keeps texture from looking plastic.
In a typical session, Portraiture sits between the healing stage and the dodge-and-burn stage. It handles the broad skin smoothing so your subsequent local contrast work has a clean, even base to build on.
When the plugin won't show up or skin looks too smooth
Portraiture is straightforward until it isn't. Most issues come down to host compatibility, the plugin not showing up, or results that look a little too smooth. Here are the ones I see most often.
The plugin is installed but Photoshop doesn't list it
This usually means the installer placed the plugin file in a folder Photoshop isn't scanning. Portraiture's Photoshop build drops a Portraiture4.8bf file into the shared plugins directory. Check these locations:
- For current Photoshop versions:
/Library/Application Support/Adobe/Plug-Ins/CC/ - If you run Photoshop under Rosetta: the same path, but make sure you installed the x86 build, not the ARM-only one. The download page gives you separate installers for a reason.
If the file is there and Photoshop still ignores it, open Preferences › Plugins inside Photoshop and confirm that Additional Plugins Folder points to the right directory. A quick relaunch of Photoshop after the installer finishes is mandatory — the plugin scanner runs at startup, not on the fly.
Lightroom Classic says "plugin not found" after updating
Lightroom Classic handles plugins differently from Photoshop. Portraiture's Lightroom build installs as a separate external editor entry, not as a filter. After a Lightroom version bump, the plugin registration sometimes breaks. Re-run the PortraitureLR4Installer.pkg and check Lightroom's External Editing preferences tab — Portraiture should appear under Additional External Editor. If it's greyed out, delete the entry, click Choose, and point it to the application bundle inside /Applications/Imagenomic/.
Results look waxy at default settings
The out-of-the-box preset applies smoothing across the entire image, and it leans aggressive. The quick fix is to drag the Smoothing slider down to the 20–30 range and increase the Sharpness slider slightly. But the real control is in the masking panel. Switch the view to Mask mode — you'll see a black-and-white representation of where the effect is landing. White areas get full smoothing; black areas get none. If it's bleeding into hair, eyebrows, or clothing edges, tighten the mask by adjusting the Skin Tones range sliders and bumping up the Edge Mask threshold.
Smart Object compatibility quirks
Running Portraiture on a Smart Object is the non-destructive way, but it introduces two small headaches. First, the plugin cannot see layers below the Smart Object, so its automatic skin detection has less context. Second, if you embed a raw file as a Smart Object directly from Lightroom, the pixel dimensions might be enormous — Portraiture processes the full resolution, and 50-megapixel files will take a few seconds even on Apple Silicon. For speed, resize the Smart Object to your output dimensions before applying the filter, or rasterise a copy and work on that.
Faster mask generation and more accurate mixed skin tones
Build 4501 ships with what Imagenomic calls a next-generation AI smoothing engine. In practice, that means two things you'll notice the first time you use it.
Mask generation is faster and more accurate across mixed skin tones. Earlier builds sometimes struggled with subjects lit by warm tungsten light or with deep skin tones under soft fill. The updated engine handles those edges better — the mask hugs the skin boundary tighter and leaves eyes, lips, and the transition around the nostrils cleaner without manual touch-up. You'll still fine-tune the mask for critical work, but the starting point is closer to finished.
Smoothing at low values looks less like a blur. In the previous generation, dragging the Smoothing slider below 30 sometimes introduced a faint evenness that read as digital. Build 4501 preserves micro-texture — pores, fine vellus hair, the slight irregularity that signals real skin — even when you push into the medium range. The difference is subtle in a side-by-side comparison at 100%, but in print at typical viewing distances it keeps portraits from crossing the line into retouched-looking.
Build 4501 also adds native Apple Silicon support for the Lightroom Classic build. Earlier versions ran under Rosetta on M-series machines, which added a few seconds of launch time and occasional interface lag when scrubbing sliders. The ARM-native path eliminates that — the plugin opens instantly and slider adjustments feel immediate, even on 45-megapixel RAWs from an R5 or Z8.
Cleaning up 150 tired faces under flat office lighting
Imagine a corporate headshot photographer wrapping up a morning shoot. Fifty employees, three frames each, all under flat office lighting that leaves skin looking tired. The deliverable is a consistent set — everyone gets the same gentle cleanup, nobody looks over-retouched, and the files go out by end of day.
Without a plugin like Portraiture, this workflow devolves into applying a saved frequency separation action to each file, then painting masks by hand for every subject. Even with batch actions, the masking step is per-image because faces sit in different positions. Fifty frames means fifty manual masks.
With Portraiture, the photographer works differently. The first image in the set gets a few minutes of attention — tweak the smoothing and masking sliders until the result looks natural, then save the settings as a named preset. The remaining forty-nine frames get the preset applied in a Photoshop action. The automatic skin detection handles the per-frame variance; the photographer only stops to adjust when a subject's skin tone falls outside the preset's masking range. What was a full afternoon of masking becomes twenty minutes of quick reviews.
One detail that matters in this scenario: the Lightroom Classic build ties into the Edit In workflow, so the photographer can select all fifty images in the Library, send them to Photoshop with the Portraiture action attached, and process them as a batch while grabbing lunch. The edited TIFFs stack alongside the originals automatically.
Retouching a 40-megapixel portrait from import to export
Let me walk through a single-image retouch from import to export. This is the kind of session where Portraiture earns its place in the toolbar.
The image is a portrait shot on a 40-megapixel body, natural window light, subject facing three-quarters toward camera. Skin has texture, a few freckles, and the light picks up some shine on the forehead. The goal is clean skin that still looks like the person.
Step 1: Ingest and global adjustments. Raw file comes into Lightroom Classic. Exposure, white balance, and a gentle S-curve get the tonality close. No clarity or texture adjustments yet — Portraiture works best on unsharpened pixels.
Step 2: Send to Photoshop. Right-click, Edit In › Adobe Photoshop, open as a 16-bit ProPhoto RGB TIFF. The image lands on a single Background layer.
Step 3: Cleanup pass. New blank layer. Spot Healing Brush set to Content-Aware, sample all layers. Remove the obvious temporary things — a small blemish on the chin, a couple of stray eyebrow hairs. This takes two minutes.
Step 4: Stamp and Smart Object. Cmd+Shift+Opt+E to merge everything into a new top layer. Right-click the layer, Convert to Smart Object. Double-click the layer name, type Portraiture-smoothed.
Step 5: Apply Portraiture. Filter › Imagenomic › Portraiture 4. The plugin opens. Switch the preview to 100% and drag the view to the cheek area. Smoothing starts at 45 — too much for this subject. Drop to 28, push Sharpness to 12. Switch to Mask view. The mask covers the forehead, cheeks, and chin but is creeping into the hair on the shadow side. Narrow the Skin Tones range slightly, push Edge Mask threshold from 5 to 8. Mask view now shows clean separation. Switch back to Result view, click OK. The filter runs as a Smart Filter on the Smart Object — non-destructive, re-editable.
Step 6: Mask the effect. Hold Opt and click the layer mask icon to add a black mask. Grab a soft white brush at 100% opacity, flow set to 30%. Paint over the forehead, cheeks, and chin. Feather the edges near the hairline and jaw. The eyes, eyebrows, lips, and nostril edges stay untouched. Toggle the mask on and off with Shift-click to check the before-and-after.
Step 7: Blend and opacity. Set the Portraiture-smoothed layer to 85% opacity. This lets a whisper of the original texture through — enough that skin reads as skin.
Step 8: Local contrast and output. Add a dodge-and-burn layer above for eye highlights and jawline definition. A gentle high-pass sharpen at 1.5 pixels on a merged top layer finishes the image. Save the PSD with layers intact, then export a JPEG for delivery.
The whole pass, from raw import to finished PSD, runs about eight minutes. The Portraiture step — opening the plugin, dialing the mask, clicking OK — accounts for sixty seconds of that. The rest is healing, masking, and local contrast work, none of which the plugin replaces but all of which becomes easier on a smooth baseline.
Build your own preset on day one
Once the installer finishes and you've confirmed the plugin shows up in Photoshop's Filter menu, a few habits will save you from the common early frustrations.
Build your own preset on day one. The included presets are starting points, not destinations. Open a typical portrait from your own work — ideally one with mixed lighting and some skin texture — and spend ten minutes dialing the Smoothing, Sharpness, and masking sliders until the result looks like your style. Save it as a named preset. This becomes your default starting point, and you'll tweak from there rather than from the factory settings every time.
Learn the mask view shortcuts. The checkbox that toggles between Result and Mask view is the most important control in the plugin. Get in the habit of switching to Mask view before clicking OK on every image. It takes two seconds and shows you exactly where the smoothing is landing. If the mask is hitting the background or clothing, you'll catch it now rather than noticing a blurred collar later.
Apply Portraiture early in the layer stack. A common first-day mistake is running the plugin at the end of a complex stack, then wondering why the colors look off. Portraiture works on the pixel data it receives. If you apply it above a Curves adjustment that's already crushed skin tones, the smoothing engine has less tonal separation to work with. Place it right after the healing stage, before any creative grading or heavy contrast moves.
Batch-process only after you trust the preset. The temptation to select fifty headshots and run a batch is strong, but wait until you've hand-processed a dozen images with your custom preset and confirmed it handles the range of skin tones and lighting in your typical work. A preset that works beautifully on a fair-skinned subject under softbox light might miss the mask on a darker skin tone under daylight. Run the batch only after you've verified the preset across your demographic range.
Keep the Lightroom and Photoshop builds separate in your head. They share a name and an interface, but they operate differently. The Lightroom build works as an external editor — it creates a rendered TIFF and hands it off to the plugin. The Photoshop build sits in the filter pipeline. If you're bouncing between both hosts, install both packages from the download page. The Photoshop
- Next-generation AI smoothing engine in build 4501, replacing the previous pixel-sampling model with a new approach to texture preservation.
- Unified ARM and x86 64-bit binary, so it runs natively on both Apple Silicon and Intel Macs without Rosetta fallback.
- macOS 13 or later
- Apple Silicon or Intel Mac (64-bit)
- Photoshop or Lightroom Classic host application
$ man imagenomic-portraiture | grep -A2 "?"
Does Portraiture run natively on Apple Silicon Macs?
Yes, the current build supports both ARM (Apple Silicon) and x86 64-bit systems and requires macOS 13 or later.
Can I use the same Portraiture download for Photoshop and Lightroom?
No, the product page provides separate builds for Photoshop and Lightroom Classic; each one installs the plugin in the correct host-specific format.
What file formats does the Portraiture plugin itself use?
Portraiture loads as a standard Photoshop.8bf filter plugin; the installer places the correct build in the host application's Plug-ins directory.
Comments 0
Sign in or create an account to leave a comment.
No comments yet. A codec, a slice, a machine — they appear after moderation.