Cockos REAPER for macOS
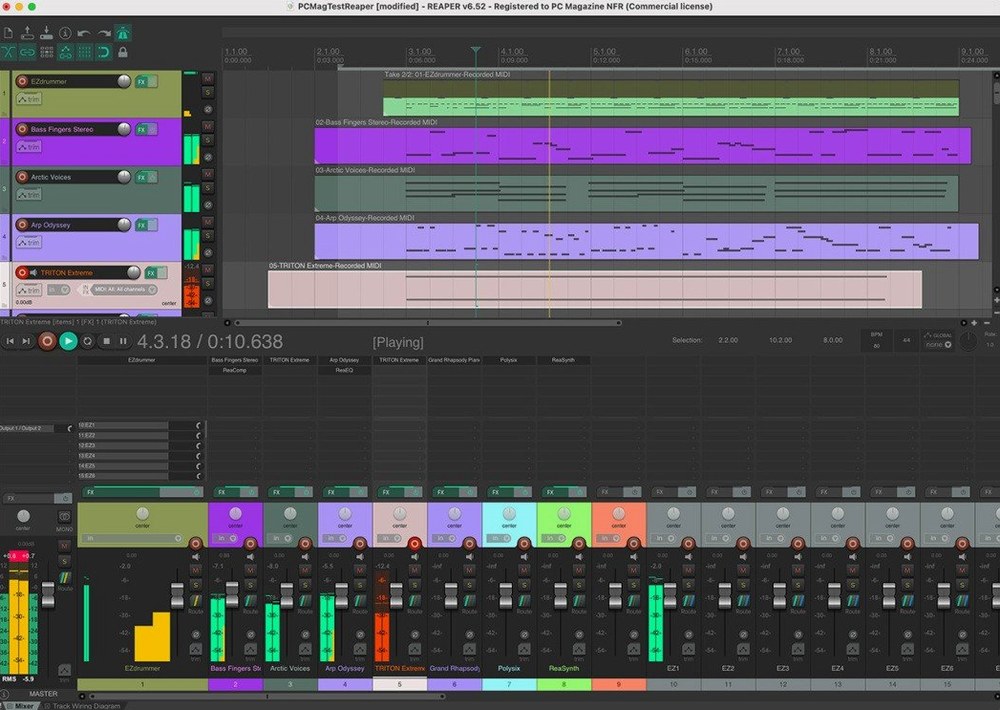
A single project can address up to 512 additional channels of loopback audio alongside 128 MIDI input hardware and loopback devices. That routing headroom defines the scale this environment works at.
REAPER — A digital audio workstation for multi-track audio, MIDI, and video recording, editing, processing, mixing, and mastering.
Full evaluation — The software can be evaluated in full for 60 days, no feature restrictions.
Studio role — When paired with an audio interface and a microphone, it turns a Mac into a recording studio.
Track routing — Audio from child tracks is routed automatically into their parent folder track, which acts as a submix bus.
Import formats — Audio and MIDI files can be dragged or imported directly into a project.
Extensibility — The application can be extended, scripted, and modified through its own API and theming engine.
Project work — It can synthesize, sample, compose, and arrange full audio projects using built-in tools and third-party plugins.
Tweaks that make the first session feel like a tool you already know
Out of the box, REAPER ships with defaults that work — but a handful of tweaks make the first session feel less like a puzzle and more like a tool you already know. Here are the ones I change on every fresh install.
- Audio device block size — Found under Preferences → Audio → Device. The default is often 512 samples, which is fine for mixing but introduces noticeable latency when tracking instruments. Drop it to 128 or 64 samples while recording, then bump it back up to 512 or 1024 for mixdowns. REAPER lets you request a block size from the driver; on a Core Audio interface that supports it, the switch is instant.
- Undo path — By default, undo history lives next to the project file. I point it to a dedicated folder on a fast internal drive. Preferences → General → Undo settings. This keeps project folders clean and prevents accidental deletion of history when archiving sessions.
- Mouse modifiers for media items — The default left-drag behavior selects and moves items together. I remap the top half of an item to marquee-select and the bottom half to move, which matches the behavior in several other DAWs. Preferences → Mouse Modifiers, context "Media item", set "left drag" to something that fits your muscle memory.
- Auto-save — REAPER does not auto-save projects by default unless you enable it. Preferences → Project → "Save to project file (automatic backups)" with a short interval like every 5 minutes, and keep multiple versions. A crash loses minutes of work instead of hours.
- Peak display gain — The mixer meters are conservative by default. Right-click a meter, choose "Peak display gain" and bump it to 3 or 6 dB for a slightly hotter readout that matches how some analog-style VU meters behave. The audio doesn't change — only the visual reference does.
A podcast editor's first hour with REAPER
Maya runs a bi-weekly interview podcast. She records two local mic inputs and a remote guest track via a browser-based double-ender. Her old editor forced her into a rigid track-type system — audio tracks couldn't hold plug-in chains the way bus tracks could, and re-routing a sidechain took three dialog boxes. She downloaded REAPER after hearing that a single track can be anything: a mono input recorder, a stereo stem host, a MIDI instrument, a bus, or all of those at once depending on what you insert and how you route it.
Her first project loads. She drops three WAV files from Finder straight onto the arrange area — REAPER builds tracks for them automatically, no import dialog. She creates a fourth track, drags it above the three voice tracks, clicks the folder icon, and those three child tracks now sum through it. That folder track gets a compressor, a de-esser, and a limiter. She right-clicks the pan knob on each child track and switches the pan mode to stereo pan for finer control over the stereo field of the remote guest's track. Within twenty minutes she has a template saved as .RTrackTemplate that she can drop into any future episode.
Workflow: comping a vocal take from five passes
REAPER's take system doesn't force you into a dedicated comping mode. It works directly on the track, with every recording pass stacked as a lane inside the same media item. Here's how a lead vocal comp comes together.
- Arm the vocal track and set the record mode to "Time selection auto-punch." Define a loop region covering the verse.
- Hit record and let the singer run through the verse five times. When you stop, the track item shows five stacked takes, each color-coded.
- Hover over any take boundary and drag to audition segments. REAPER splits and selects the topmost take by default, but you can click any lane to promote a segment instantly — no separate comp track, no swipe-comp mode.
- For tricky syllables, hold Option and click-drag to audition a specific section without committing. Release to return to the comp.
- Crossfades between take segments appear automatically. Adjust the fade length by dragging the edge of any split — REAPER applies a short equal-power crossfade that avoids clicks even on zero-crossing mismatches.
- When the comp is solid, right-click the item and choose "Crop to active take" to clean up unused audio from the project directory. Or leave the takes intact and flatten later — the
.RPPproject file references the original recordings non-destructively.
No dedicated comp tool, no track restrictions. The take lanes are just a view state on an ordinary audio track.
Under 30 MB and launching in two seconds on an M-series Mac
REAPER's installer for macOS weighs under 30 MB — the universal binary for both Apple Silicon and Intel fits inside a single .dmg. Launch time on an M-series Mac is under two seconds with an empty project, and around four seconds when loading a 60-track mix session with a few hundred plug-in instances. The application stays responsive while other DAWs might beachball during auto-save or waveform rebuilds.
The audio engine runs on a separate high-priority thread, so GUI lag rarely affects recording or playback. I've pushed sessions past 200 tracks with convolution reverbs on ten aux buses and the CPU meter in Activity Monitor hovered around 55% on an M1 Pro — REAPER's own performance meter showed roughly 28% RT CPU use, which tracks with its efficient use of the performance cores. Anticipative FX processing (on by default) renders plug-in chains ahead of time on idle cores, which keeps the real-time thread light even with heavy linear-phase EQs and lookahead limiters.
Stability is a quiet strength. Crashes are rare enough that the auto-save I configured earlier has saved me exactly twice in three years of daily use. Plug-in sandboxing — Preferences → Plug-ins → Compatibility → "Run FX in a separate process" — isolates misbehaving third-party plug-ins so they can crash without taking the whole session down. The crashed plug-in window goes black, REAPER flags it, and you reload it without stopping playback. That feature alone makes a reaper mac torrent worth exploring if you run older or less stable AU/VST3 plug-ins that haven't been updated for Apple Silicon.
Memory use stays modest. A blank project idles around 180 MB. A dense 100-track mix with sampled instruments might climb to 2–3 GB, but REAPER unloads unused plug-in state when you bypass tracks, reclaiming RAM that other DAWs hold onto. For laptops running off battery, lower CPU draw means less fan noise and longer recording time before the charger comes out.
A tracking template routed to a "Band Submix" folder from the Templates folder
It's 9:30 a.m. I open a tracking template from the ~/Library/Application Support/REAPER/ProjectTemplates/ folder. Four drum mics, two guitar DIs, one bass DI, and a scratch vocal channel are already routed to a folder track labeled "Band Submix." Each child track has a tuner plug-in bypassed on insert slot one and an EQ sitting idle on slot two. REAPER's track layout remembers which plug-ins are online or bypassed per project, so the template loads with everything ready but nothing taxing the CPU.
I arm the drum tracks, check that the block size is at 64 samples (Preferences → Audio → Device), and hit record. The band runs through a take. Punch-ins are handled on the fly — I've set a time selection around the bridge and REAPER automatically drops into record at the selection start and out at the end. The new takes stack neatly in lanes on each drum track. No stopping, no manual punch points to set up.
After tracking, I group the drum tracks (select them, press G, check "Group enabled" and "Item selection") so any edit to one snare hit moves all drum mics together. Phase alignment is a quick drag — the track delay parameter in the routing window shifts the snare top mic by -0.8 ms to line up with the overheads, and I can type the value in samples or milliseconds directly.
By 11 a.m. I'm printing rough mixes. I insert a stereo track at the top of the session, set its input to "Record: output (stereo)" and point the record source at the master bus. A real-time bounce runs while I listen — REAPER writes the file and I can keep tweaking plug-ins as it prints. The rendered WAV lands on the desktop at 24-bit/48 kHz, named with the project timestamp because I set that in the render wildcard pattern earlier. One more listen through, then the session file gets saved alongside the raw multitrack stems for recall next week.
- macOS 10.15 or later
- Apple Silicon or Intel processor
- Interface language: English
Comments 0
Sign in or create an account to leave a comment.
No comments yet. A codec, a slice, a machine — they appear after moderation.