Serato Studio for macOS
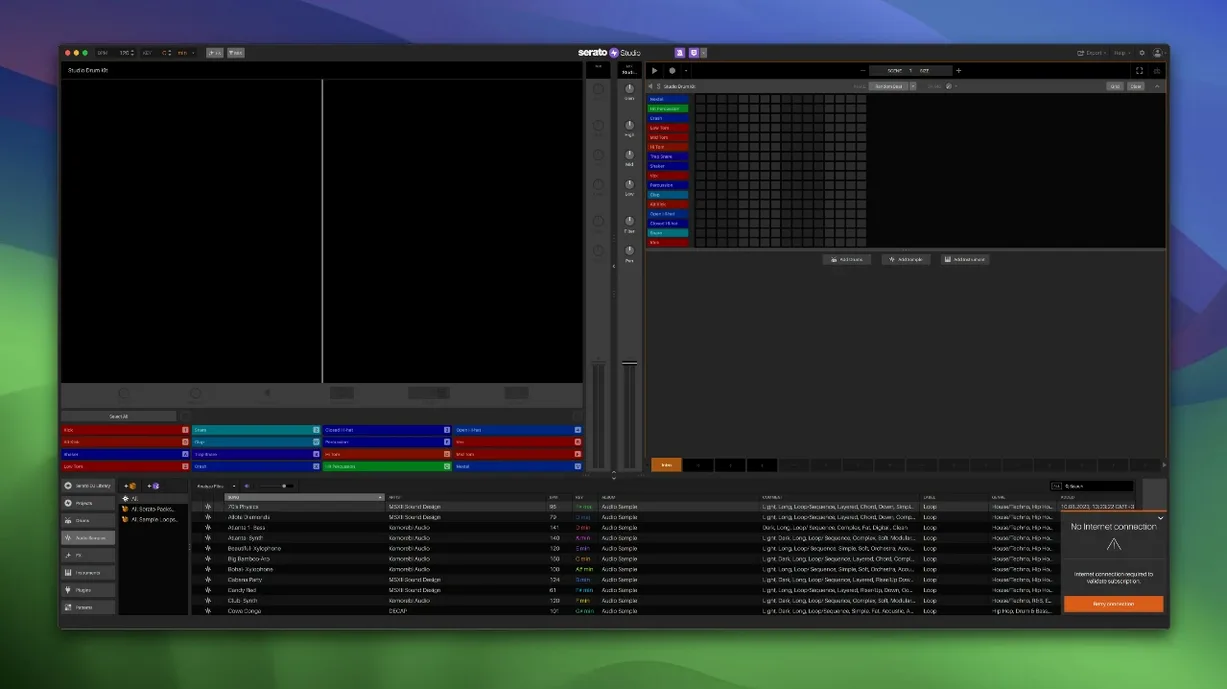
A producer grabs an old soul record, drops it into a Sample Deck, and isolates the drum break from the bassline with two clicks. While that loops, they sketch a chord progression using Auto Chord mode—no theory degree required—and pull a kick pattern from the built-in kits. In under five minutes, there's a full sketch playing back, perfectly in time thanks to on-the-fly BPM syncing and one-touch key shifting.
- Load and separate. Drop any audio onto a Sample Deck. Adjust the individual levels for acapella, melody, bassline, and drums right there in the interface. You can automate Stems On/Off and those per-stem levels across a scene, so a track can fall apart and rebuild itself over time.
- Build the foundation. Browse the included drum patterns and kits, or load your own samples. The sequencer locks to your project tempo; key changes happen with a single click so everything stays musically coherent.
- Layer with plugins. Serato Studio hosts your existing AU and VST instruments and effects. Automation lanes give you full control over parameters across every scene in your arrangement.
- Arrange in scenes. The Scene View is where you sequence the song structure. Trigger stems, mute parts, ride the faders—everything that happens in a scene can be automated, from stem levels to effects parameters.
The whole workflow assumes you think in phrases and drops rather than bars and staves. It's music production that speaks the language of the booth, not the conservatory.
Reads your Serato DJ crates and cues without re-importing
Serato Studio isn't an island. It reads your existing Serato DJ library directly—crates, cues, track ratings, the lot. If you've spent years prepping tracks in Serato DJ, every one of those files appears inside Studio without re-importing a thing. The recent library update added Track Rating and Favorite Crates, so a crate you star during a gig is already highlighted when you sit down to produce the next morning.
On the hardware side, plugging in a Serato-compatible controller or mixer gives you tactile control over the channel faders, EQs, and transport. The version 2.5.0 update added native control for the AlphaTheta SLAB, which means jogwheel nudging, pad triggering, and fader rides all map without a manual MIDI-learn session. If your controller isn't natively supported, the standard MIDI mapping panel catches everything else.
macOS integration runs deep enough to be useful and shallow enough to stay out of the way. The app shows up in the Audio MIDI Setup routing grid like any Core Audio citizen, so routing output to a multi-channel interface or a secondary output for a cue mix works the way you'd expect. Drag-and-drop from Finder lands audio directly into a Sample Deck slot, and the app respects the system Dark Mode setting. If you're on Apple Silicon hardware, Studio runs native—no Rosetta translation layer sitting between your buffer size and the CPU.
VST and AU plugin scanning happens at launch, pulling from the standard system folders. No proprietary sandbox, no wrapper. That means your effect chains and instrument libraries from other DAWs appear here automatically, provided you installed them system-wide.
What happens when you start a blank project at 120 BPM
You launch the app and it opens to a fresh project at 120 BPM in C minor—defaults you can change, but they're sensible starting points. The first thing you do is open the Library panel. You've got a crate called "Soul 45s" that you built in Serato DJ months ago, all rated four or five stars. You drag a dusty horns loop onto Sample Deck 1.
The waveform appears immediately, color-coded by frequency content. You hit the Stems button, and the interface splits the loop into four horizontal lanes: acapella, melody, bassline, drums. You mute the bassline lane, drop the melody level to about 60%, and keep the drums and a faint vocal bleed. It sounds raw in exactly the right way.
You click into the Scene View. The loop is already placed on Scene 1. You duplicate the scene, then on Scene 2 you drag the Stems On/Off parameter to switch off drums for the first half of the scene and bring them back for the drop. You draw a ramp on the melody stem level so it swells in over four bars. No menu diving—you right-click the stem fader and pick "Show Automation," then paint the curve.
Now you need a bassline. You open the instrument rack and load a mono synth through an AU plugin you've used for years. Auto Chord mode is on by default, set to C minor. You play a single note—one key—and the engine voices a full minor seventh chord. You switch to a different inversion with one click, then hit record. The part lays down in the sequencer. You tap the Feel control and nudge it toward "Loose." Quantize stays on, but the note attacks now have micro-variations that imitate a live keyboard player's timing.
Three scenes later, you've got an intro, a verse section, and a chorus. You export stems for a vocalist to work with—each track renders as a separate .wav file with the scene structure intact. The whole session took maybe twenty minutes.
Flip the pad layout to match your DJ controller
The Reverse Pad Order option in the setup screen flips the pad layout on controllers, so if your muscle memory comes from a specific piece of DJ gear, you can match its physical pad arrangement instead of relearning the default. It's a one-checkbox fix that saves real frustration during the first few sessions.
The Crate Search field in the library filters as you type, across all your crates and sub-crates simultaneously. You don't need to remember which crate you filed a break under—just type a few characters from the filename and it surfaces.
Holding Option while dragging a sample from the library into a Sample Deck slot replaces the current sample without stopping playback. Useful when you're auditioning kick layers against a running beat and don't want the momentum to drop.
Right-clicking any knob or fader offers "Show Automation" as a context command, which jumps you straight to that parameter's lane in Scene View. It's a fast path compared to hunting through automation menus, and it works on stock controls and plugin parameters alike.
The metronome has a pre-count toggle that's independent of the record-arm state. You can leave the click running with a two-bar count-in even when you're not recording, which helps when you're practicing a part before committing it.
Which settings to change first
Open Preferences before you make anything serious. The first stop is the Audio tab: set your buffer size explicitly rather than leaving it on the default. Lower values reduce latency for recording MIDI parts; higher values keep playback stable when your project fills up with plugins and stem processing. On an Apple Silicon machine, 128 samples is a safe starting point for a light project; bump to 256 or 512 once automation and effects pile up.
Under Library, enable "Show Track Rating" if it isn't already on. The star ratings you set in Serato DJ carry over, and seeing them in the browser makes it easier to grab material you already trust. While you're there, check "Rescan on Launch" so any new files you've added to your DJ library appear without a manual refresh.
The General tab has the Reverse Pad Order checkbox mentioned earlier, plus a "Default Project Key" dropdown. Changing this from C to whatever key you naturally gravitate toward means Auto Chord and the key-shifting controls start from your home base every time, cutting out an extra click on every new project.
Finally, if you're working with a controller, open the MIDI tab and confirm the device appears in the active list. Serato Studio maps common hardware automatically, but you can override individual pad assignments by right-clicking any on-screen pad and selecting "Learn MIDI Assignment." Tap the physical pad, and it's mapped—no separate mapping window required.
- Native control support for the AlphaTheta SLAB hardware.
- Per-stem level adjustment—acapella, melody, bassline, and drums—now available in Sample Decks.
- Automation for Stems On/Off and individual stem levels added to Scene View.
- Added compatibility with
macOS 26 Tahoe.
- macOS 10.14 or later, including
macOS 26 Tahoe - Intel or Apple Silicon Mac
$ man serato-studio | grep -A2 "?"
What plug-in formats does Serato Studio support?
It loads Audio Unit (AU) and VST plug-ins, giving you access to third-party instruments and effects directly inside your project.
Can I control stem levels individually?
Yes. In any Sample Deck you can adjust acapella, melody, bassline, and drum stems independently, and automate those level changes across scenes.
Comments 0
Sign in or create an account to leave a comment.
No comments yet. A codec, a slice, a machine — they appear after moderation.