

Color Finale for macOS
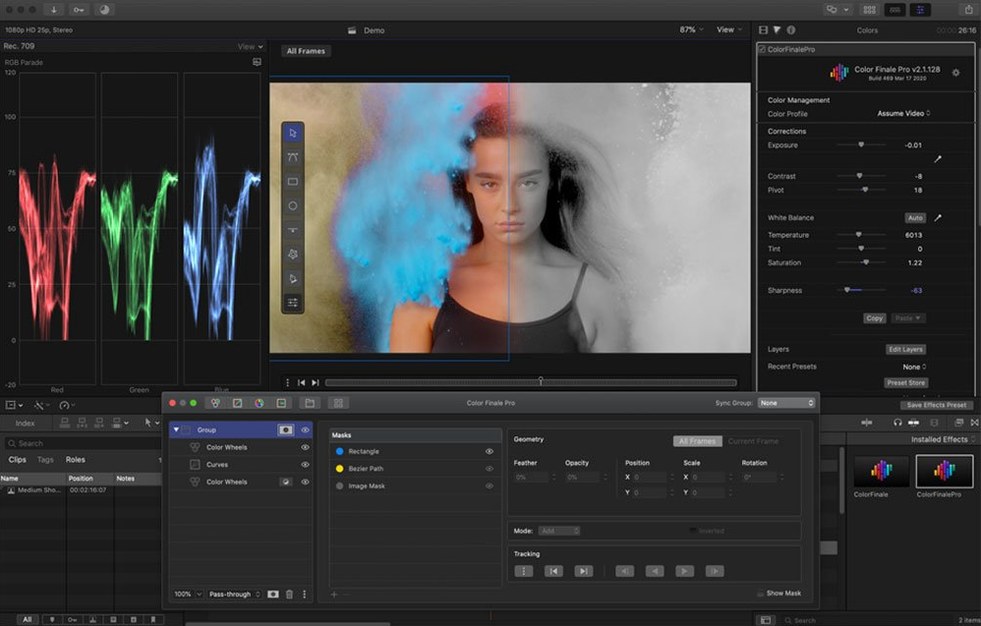
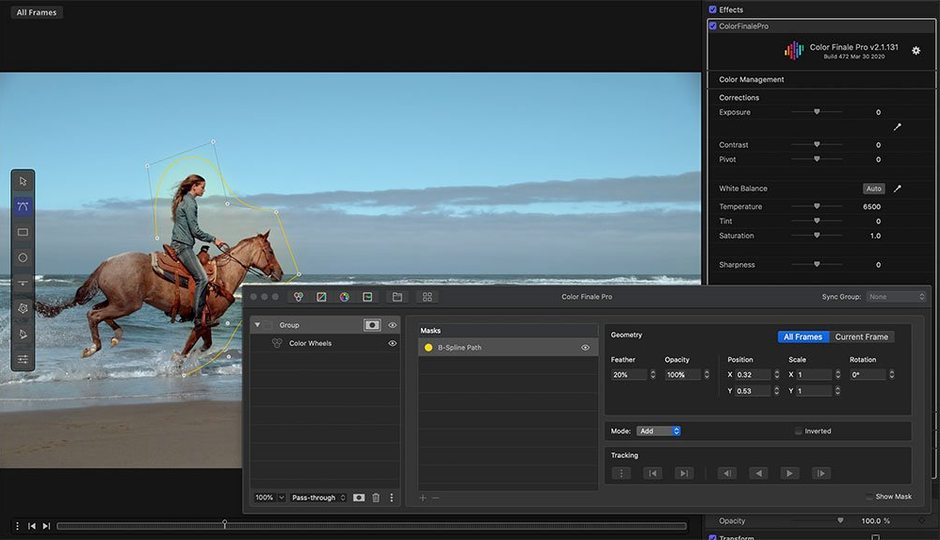
The current build, 2.2.8, is a 64‑bit x86 package that installs as a video effect plug‑in for Motion and shows up right inside Final Cut Pro 10.7 or newer.
Match a grade across several clips
Layered adjustments mean you can stack corrections without baking anything in. Once a look is right, save it as a preset or export a LUT through the built‑in authoring tools so other projects pick it up too.
Recreate a look from reference stills
The bonus workflow for recreating looks gives you color wheels and scopes side by side. Use it to pull a palette from a frame grab and apply it to fresh footage without leaving the timeline.
Use custom LUTs alongside Final Cut’s own tools
Color Finale ships with LUT Utility, so .cube files you already own sit in the inspector next to the built‑in color board. Everything runs on the same Intel timeline — no round‑tripping to another app.
Hitting a ceiling with the built‑in color board around project three
Final Cut Pro editors who grade their own work tend to hit a ceiling with the built‑in color board around the second or third project where a client asks for a specific look. That is where Color Finale slots in naturally. The wheel‑and‑curve interface mirrors what you see in dedicated grading rooms, so someone who learned color on Resolve or Baselight can sit down at an FCP timeline and not feel like they stepped back ten years.
Wedding and event editors benefit from the layered adjustments more than most. A single clip can hold a primary balance pass, a skin‑tone qualifier, and a stylised LUT — all editable independently a week later when the couple asks for something warmer. Corporate video people who deliver to multiple destinations (web, in‑house screens, broadcast) use the LUT authoring tools to pump out .cube files matched to each display target without leaving the timeline.
Motion graphics editors who build templates in Motion get the plug‑in there too, so a title sequence can carry the same grade as the cut footage below it. That is a workflow detail easy to overlook until you need a consistent look across composited elements and live action.
Option‑dragging a color‑wheel ring drops sensitivity to one‑tenth
Hold down the Option key while dragging any color‑wheel ring and the adjustment drops to one‑tenth sensitivity — useful when you are nudging skin tones half a percent and the default drag overshoots every time. The same modifier works on curve point handles.
Double‑click a curve point’s label to type a value directly instead of dragging. On a trackpad in a coffee shop, that saves a lot of re‑grabbing.
The Preset Store panel has a “recently used” section that lives at the top of the list. It pulls from your saved presets, not the bundled ASCEND collection, so the five looks you actually reuse are always two clicks away without scrolling through folders.
If you colour‑code clips in Final Cut Pro’s timeline, Color Finale respects those colours in its clip list — a tiny touch that makes locating the right shot faster when you have sixty corrections open.
The Color Board stops at three wheels with no curves or qualifiers
The most direct comparison is Final Cut Pro’s native Color Board. The Color Board handles basic balance and saturation well, but it stops at three wheels and a handful of global controls. There are no curves, no qualifiers, no layer stack, and no LUT export. Color Finale sits inside the same inspector and extends every one of those limits without launching a separate app.
DaVinci Resolve (the free standalone) is the heavyweight alternative. Its grading room is deeper in every direction — node trees, tracking windows, temporal noise reduction, the works. The trade‑off is round‑tripping. You export an XML from FCP, import to Resolve, grade, render, and bring it back. That pipeline works for long‑form projects where a dedicated colorist owns the grade, but for a solo editor cutting a five‑minute piece that ships tomorrow, the back‑and‑forth eats time Color Finale simply does not need.
MotionVFX mLUT is a lightweight LUT loader for FCP. It loads .cube files and adjusts intensity, full stop. No wheels, no curves, no qualifiers. It is the answer when the only question is “apply this LUT at 60%” — but it is not a grading tool. Color Finale’s LUT Utility covers that same ground and then hands you a full correction suite, so mLUT users who start pushing beyond simple look‑application often end up here.
Starting with a timeline rough‑cut of mixed‑light interview footage
A typical session starts with a timeline rough‑cut of interview footage. The edit is locked; the lighting is mixed — half shot under window light, half under a ceiling fixture that leans green. You drop Color Finale onto the first clip from the Effects browser, just like any other video effect.
The plug‑in opens with a neutral default correction. You spin the Lift wheel a tick toward blue to pull the shadow cast back to neutral, then push Gamma a half‑stop warmer. That evens out about seventy per cent of the mismatch in ten seconds. For the remaining green spike in the mids, you open the HSL Curves tab, pick the green‑yellow arc, and drop its mid‑point by five points. The skin tones stay untouched because the curve is narrow enough to miss them.
With the base correction set, you duplicate the adjustment layer by hitting the + icon in the layer stack. The new layer gets a LUT from the ASCEND collection — a film‑style look that desaturates the blues slightly and lifts the reds. You dial it back to 40% opacity with the slider so the correction underneath still reads.
The producer messages asking for the background window blown out a bit more. You add a third layer, grab the Power Window (a circular mask), and place it over the window area, then boost exposure by a third of a stop inside the mask only. No re‑rendering the composite, no round‑trip — the three layers sit in the inspector, editable in any order.
You select the graded clip, save the layer stack as a preset called “Interview_WindowFix,” and drag it onto the other six interview clips. Each one drops into place with its own instance you can tweak individually. The session wraps by exporting a .cube file of the final look so the motion‑graphics teammate can apply it to the lower‑third titles in Motion.
The plug‑in doesn’t appear because the separate app wasn’t launched
The plug‑in does not appear in Final Cut Pro. This almost always traces back to the separate Color Finale application not being launched at least once. The .dmg delivers both the app and the plug‑in components; dragging the app to /Applications and opening it lets the helper register the effect with Final Cut Pro and Motion. After that first run, you can quit the standalone app — FCP handles the rest.
Gatekeeper blocks the installer. The disk image includes a “Gatekeeper friendly” script. Mount the image, right‑click the script, choose Open, and follow the Terminal prompt to press Enter. That bypasses the unsigned‑developer warning without disabling System Integrity Protection globally.
Performance drops with several layers on a 4K timeline. On Intel Macs, each Color Finale layer is a separate GPU render pass. If playback stutters, collapse a finished correction to a compound clip in FCP (select the clip, press Option‑G). The grade bakes into the compound and you can still step back inside it later to tweak. Alternatively, drop the canvas viewer to “Better Performance” while grading, then switch to “Better Quality” before export.
Exported LUTs look clipped in other apps. Color Finale authors LUTs that include the full 0–1 range, but some LUT loaders clamp at super‑white or sub‑black. If a .cube you wrote looks crushed elsewhere, re‑export it with the “legal range” option checked in the LUT authoring dialogue — that constrains the transform to 64–940 for 10‑bit video and plays friendlier with broadcast monitors.
People searching for a color finale activation code free or a color finale 2 pro crack download will want to make sure they get a version that includes the layered‑adjustment engine — build 2.2.8 is the 64‑bit x86 release that introduced the stack, and older cracks are stuck on version 1.x with a single‑correction model. The color finale torrent floating around various trackers occasionally ships with a damaged LUT Utility component too, which causes .cube imports to fail silently. Dropping a known‑good LUT into ~/Library/Application Support/Color Finale/LUTs/ manually and restarting FCP usually restores it. For anyone on a color finale 2 free download hunt, the gatekeeper‑bypass step described earlier is the same whether the build came from the developer’s site or elsewhere — launch the app once, let the helper do its registration, and the effect slot appears in FCP.
- macOS 10.12 or later
- Intel processor
- Final Cut Pro 10.7 or newer
Comments 0
Sign in or create an account to leave a comment.
No comments yet. A codec, a slice, a machine — they appear after moderation.
More in Final Cut Pro Plugins
cd ../ Dehancer Pro
Final Cut Pro Plugins 382 MB
 Flicker Free
Final Cut Pro Plugins 24 MB
 FxFactory Pro
Final Cut Pro Plugins 68 MB
 MotionVFX mInfographics
Final Cut Pro Plugins 8 MB
 MotionVFX mKBHD
Final Cut Pro Plugins 12 MB
 MotionVFX - mLowers Universal for FCP
Final Cut Pro Plugins 71 MB
 MotionVFX mModules
Final Cut Pro Plugins 5 MB
 Motionvfx - mTitle Cinematic
Final Cut Pro Plugins 5 MB