

Arturia Efx AMBIENT for macOS
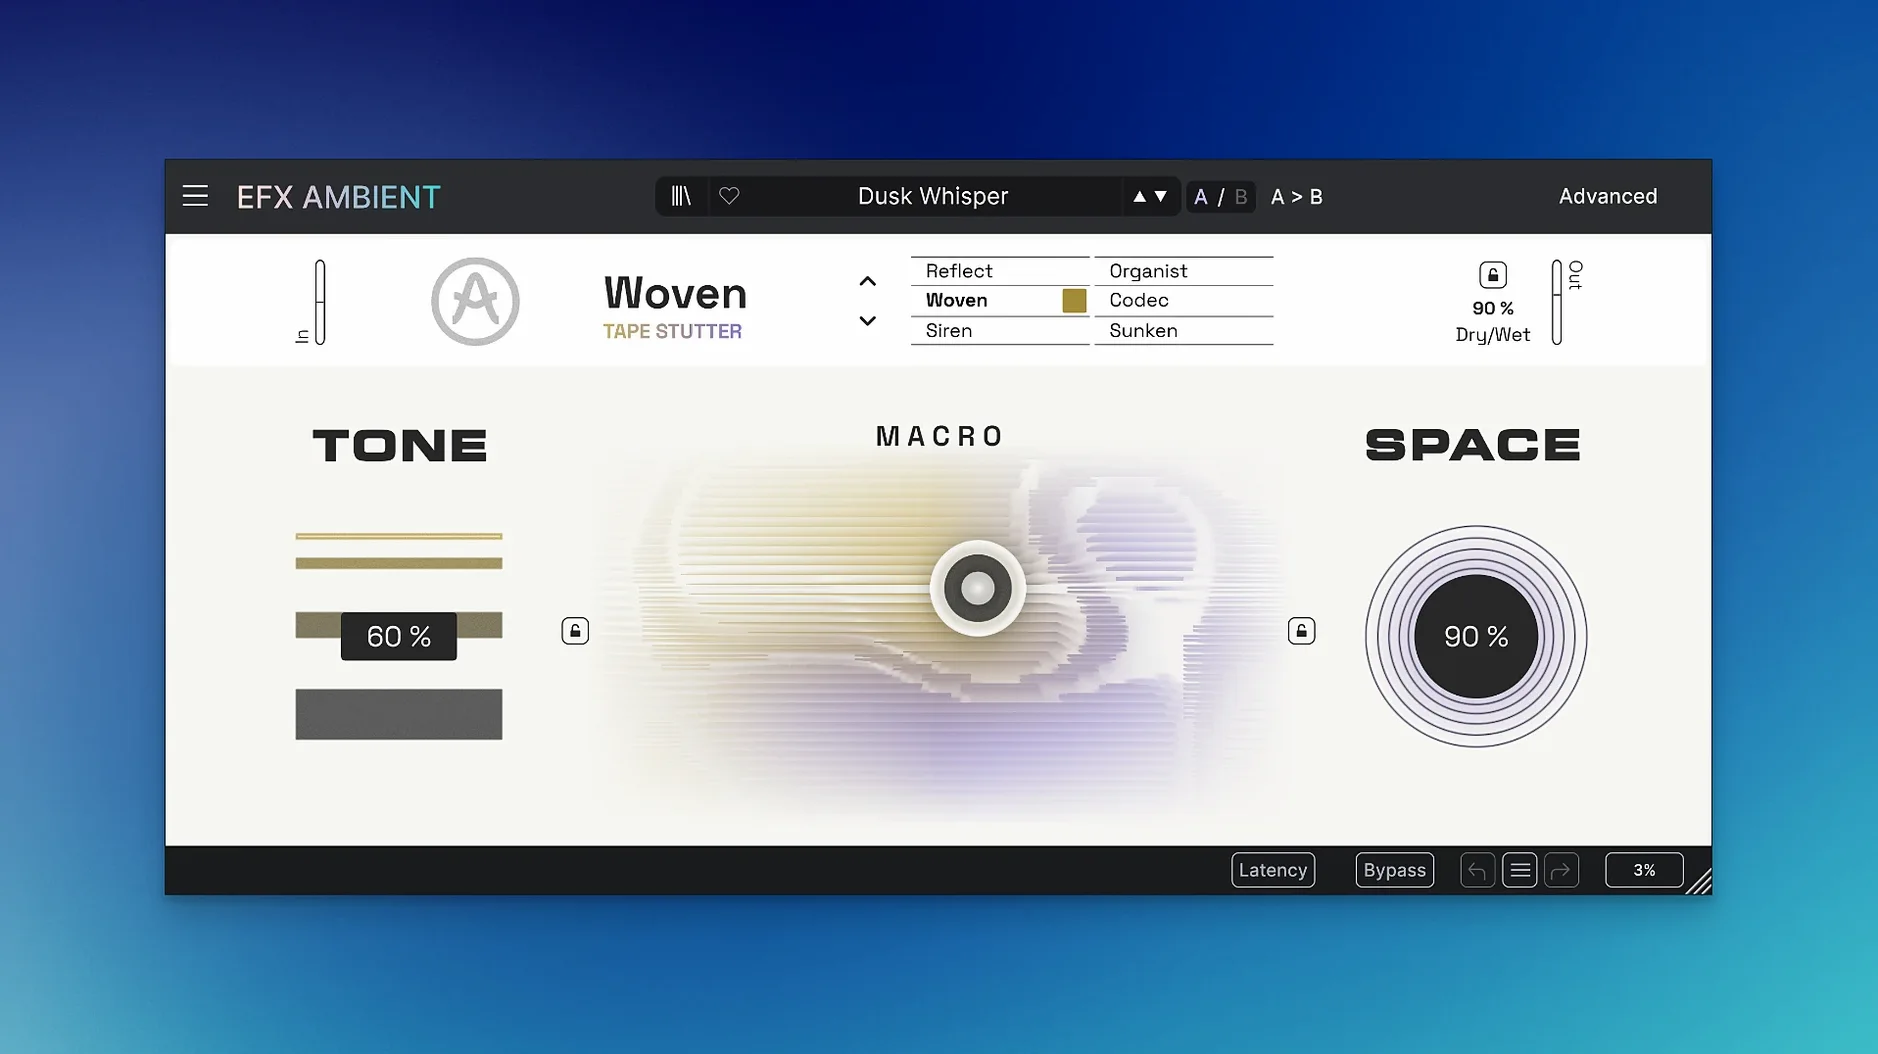
Getting a sound to float, blur, or drift into a cinematic space usually means chaining a handful of plug-ins and spending half an hour on automation lanes. Efx AMBIENT collapses that into a single window built specifically for spatial movement and texture — without a modular rack in sight.
| Detail | Spec |
|---|---|
| Version | 1.0.0 |
| Architecture | Apple Silicon and Intel (Universal) |
| Formats | AU, VST3, AAX |
| macOS | 10.10 and later |
The plug-in ships as a universal binary inside a standard .pkg installer from a .dmg, so it loads natively on Apple Silicon in any DAW that hosts AU, VST3, or AAX — Logic, Live, Cubase, Pro Tools, and Reaper are all fair game. Six modes define its character: one delivers soft, blurred textures; another handles reverse playback; a third leans into pitch shifting and detailed deformation. A 2D Macro control ties multiple parameters to a single XY point, and the Advanced panel opens up time-based shaping for motion and depth that changes fast. Sonically, it sits between a reverb and a multieffect, but the routing is purpose-built for ambient tails and cinematic movement rather than general-purpose mixing.
Ten minutes from dry piano to Cloud mode texture
I dropped Efx AMBIENT onto a dry piano track — a simple four-bar loop with too much attack and no sense of space. Here's how the next ten minutes went, step by step.
First, I set the mode to Cloud. The transient flattened instantly, replaced by a blurred wash that followed the chord changes without masking them. The 2D Macro sat dead center; dragging the puck toward the top-right corner opened the decay and introduced a slow pitch waver I hadn't dialed in separately. That's the thing — the Macro maps to multiple parameters at once, and the curves aren't linear. Pushing diagonally feels different from pushing along an edge.
Next, I opened the Advanced panel. Four time-based slots sit there — envelope follower, LFO, step sequencer, and a random generator — each assignable to almost any target. I patched a slow triangle LFO to the Macro's X position and set the range narrow, so the sound drifted gently between two textures without me touching anything. The envelope follower went to wet/dry, ducking the effect slightly when the piano hit harder.
By minute eight, I switched to Reverse mode on a duplicate track, dropped the mix to about 30%, and let the reverse grains poke through behind the forward signal. The built-in feedback network in that mode smears the repeats, so what came out sounded less like a backwards tape and more like a tail that arrives before the note. I froze both tracks and called it a day.
A sound designer's quick save
A sound designer I know had to deliver a sci-fi UI transition — something between a data glitch and a breath — before lunch. She grabbed a vocal snippet, loaded Efx AMBIENT in Granular mode, and pulled the grain size down to around 40 ms. The 2D Macro went toward maximum density and minimum pitch coherence, which turned the voice into a metallic shimmer.
She then routed the step sequencer in the Advanced panel to the grain position, set it to 16 steps with random values, and keyed the sequence to tempo. The result: a rhythmic, never-repeating texture that sounded like a machine whispering through a broken conduit. Bounce, trim, drop into the timeline. No chaining three granular engines and a delay. One instance, about six minutes of tweaking.
Option-click a Macro ring snaps the puck to center
A few shortcuts and behaviors that aren't spelled out in the main interface:
- Option-click a Macro ring. The puck snaps back to center, which resets whatever multi-parameter mapping lives at that position. Faster than hunting for a reset button.
- Right-click any knob to open the modulation assignment menu directly — no need to go through the Advanced panel for quick LFO or envelope patches.
- The output level compensates internally when you push the feedback high in FDN mode. It's not brickwall limiting, but it tames the worst peaks so you don't blow your ears out while dialing in a long decay.
- In Pitch mode, the interval labels on the shift knobs don't show all the options — holding Shift while dragging jumps in semitones, but free-dragging gives microtonal offsets between the detents. Useful for detuned pads that don't land on a clean fifth.
- The Random generator in the Advanced panel has a smoothing control tucked next to the rate. Cranking smoothing turns sharp jumps into gradual slews, which matters if you're randomizing filter cutoff on a sustained drone.
Why it falls apart when you use it as a send
I've seen a few patterns pop up in forums and from people trying the plug-in for the first time. The common ones:
Treating it like a reverb on a send. Efx AMBIENT works better as an insert on most sources because the modes are designed to replace the dry signal's envelope, not sit behind it. On a send, you lose the transient-smearing and pitch behaviors that make the modes distinct. If you do use a send, kill the dry signal inside the plug-in and commit to the wet texture.
Ignoring the Macro's range settings. Out of the box, the 2D Macro maps to parameters with full-range curves. If you don't trim those ranges in the modulation matrix, a small nudge can push feedback into self-oscillation or drop grain density to near-silence. Right-click the Macro and set min/max values for each destination — it takes thirty seconds and saves a mix.
Running every mode at full wet. Reverse and Granular modes in particular gain clarity when the mix sits around 40–60%. The dry component anchors pitch and timing, while the processed side provides the atmosphere. Full wet in Reverse mode can turn a rhythmic source into mush unless you tighten the grain window.
Skipping the feedback filter. Every mode with a feedback path — FDN, Cloud, Reverse — has a high-cut and low-cut inside the feedback loop, not just on the output. If the tail builds up mud, those internal filters clean it before it recirculates. Beginners often reach for an EQ after the plug-in instead of trimming the loop itself.
Assuming all modes use the same engine. They don't. Cloud uses overlapping granular clouds, FDN runs a feedback delay network tuned for diffusion, Reverse does real-time buffer reversal with windowing, and the spectral modes work in the frequency domain. CPU load varies. If your session is choking, try rendering or freezing the spectral modes first — they hit harder than Cloud or Reverse on Apple Silicon, though the difference is smaller on an M2 or M3.
- Initial release version 1.0.0 — first public build with all six spatial modes, the 2D Macro control, and the Advanced time-shaping panel.
- macOS 10.10 or later
- Apple Silicon or Intel processor
- AU, VST3, or AAX compatible host
$ man arturia-efx-ambient | grep -A2 "?"
What sound design modes does Efx AMBIENT include?
It has six distinct modes covering reverse playback, soft blurred textures, pitch shifting, and detailed sound deformation, all aimed at cinematic ambient effects.
Comments 0
Sign in or create an account to leave a comment.
No comments yet. A codec, a slice, a machine — they appear after moderation.
More in VST Plugins
cd ../ Arturia Augmented BRASS
VST Plugins 2.3 GB
 Arturia Emulator II V
VST Plugins 700 MB
 Arturia Analog Lab V
VST Plugins 2 GB Updated
 Arturia FX Collection
VST Plugins 16.1 GB
 Arturia Mellotron V
VST Plugins 2.1 GB
 Arturia MiniFreak V
VST Plugins 468 MB Updated
 Arturia Pigments
VST Plugins 1.8 GB
 Analog Realism Sphinx 101
VST Plugins 82 MB