
Sonic Academy KICK for macOS
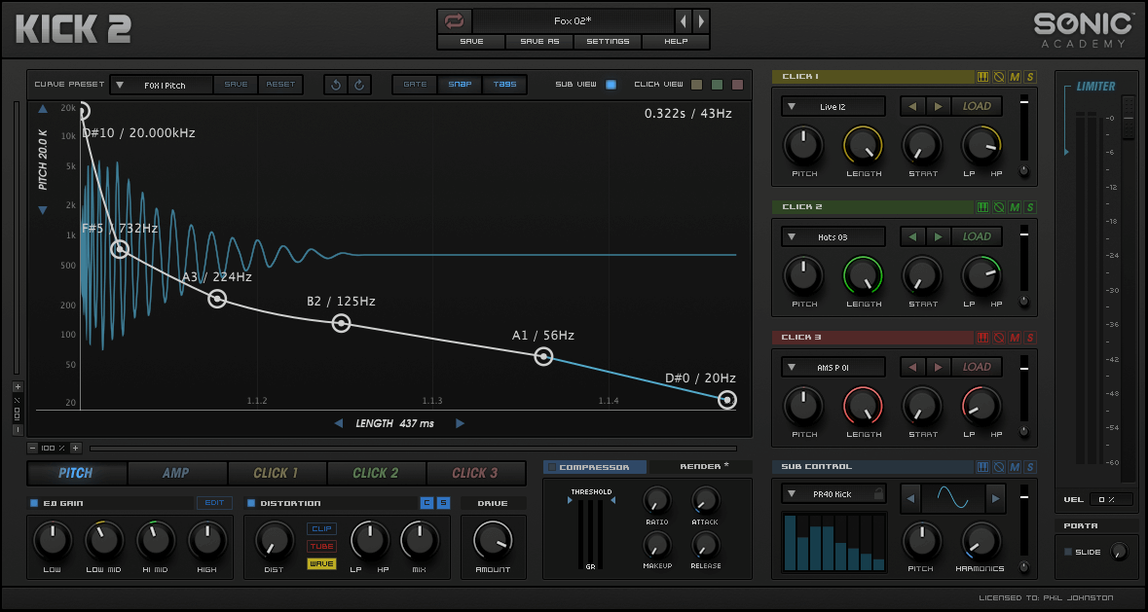
You have a project open, the arrangement is taking shape, but the low end needs a foundation that a sample library just isn't giving you. You open KICK to build the transient and body from oscillators and noise, dialing in a sound that fits the exact pitch and length of your track.
- Ships as a VST and AU plugin, with a standalone application also included in the package.
- The synthesis engine splits the sound into three distinct click-shaping areas for detailed transient design.
- Comes bundled with over 230 factory presets covering a wide range of electronic and acoustic kick profiles.
- Onboard processing chain includes an equalizer, compressor, limiter, and a distortion module.
- Intel-native code; runs on Apple Silicon Macs via the Rosetta 2 translation layer.
This is the updated version of the original Kick by Nicky Romero, and the internal version number sits at 1.1.1. The audio path keeps the entire signal flow inside the box, so you are not layering samples but building the fundamental, click, and noise components with direct control over pitch sweeps and amplitude envelopes. The distortion and dynamics modules sit at the output stage for final shaping before the signal hits your DAW channel.
How does it cut through a busy progressive house synth arrangement?
A producer working on a progressive house track with a busy synth arrangement needs the kick to cut through without eating up headroom. You load KICK on a new instrument track in Logic, browse to the Punchy Club category, and land on a preset that hits around G1. The sub oscillator is already tuned to the root of the track, so the low end feels anchored immediately. With three layers of pad synths and a wide stereo lead, the kick still pokes through the center because the click transients occupy the 2-5 kHz range without clashing with the hi-hats. Tweaking the length knob from the default 400 ms down to around 280 ms tightens the tail just enough that the sidechain compressor on the bass line breathes more naturally. Five minutes of adjustment and the mix already sounds more locked together than it did with the sample-based kick you were using before.
Which sub oscillator waveform gives you more harmonics?
Out of the box, a few defaults are worth revisiting before you judge any preset.
- Sub oscillator waveform. The sine wave is the factory starting point, but switching to the triangle or the additional waveforms gives you harmonics that can help the kick translate on smaller speakers. A triangle wave adds enough second-harmonic content that the body registers on laptop speakers without needing heavy saturation later.
- Click envelope timing. The three click generators default to short decay times. Lengthening the second click by 20-30 ms and shifting its pitch down slightly can turn a thin attack into something with more knock, especially useful for trap or hip-hop where the transient needs weight.
- Distortion routing. The distortion module sits after the EQ and compressor in the default signal chain. Dragging it before the compressor changes the character entirely — the compressor then reacts to the saturated transient rather than the clean one, which often yields a punchier result at lower gain reduction values.
- Output limiter threshold. The limiter is on by default with a ceiling near 0 dB. Backing it off to -3 dB and driving the compressor output harder instead gives you more consistent perceived loudness across presets without squashing the attack.
How much CPU does the distortion module add on an Intel Mac?
On an Intel Mac running macOS Monterey, a single instance of KICK 1.1.1 consumes roughly 2-3% CPU on a 2019 i9 MacBook Pro at a 128-sample buffer. That number creeps up to about 5% when the distortion module is running one of the more aggressive algorithms, which is still negligible in a project with 40-plus tracks. Loading presets is near-instant; the browser updates as you scroll through categories with no lag or audio dropouts. The UI redraws smoothly even at non-integer scaling factors on a 4K display.
Stability has been uneventful in a good way. Over a session that spanned four hours of switching between Logic Pro and Ableton Live, the plugin survived a dozen preset changes, multiple host transport stops and starts, and a project reload without a single crash or hung note. The VST3 version in Ableton responds correctly to parameter automation; AU validation in Logic passes on the first scan. The only quirk observed was a brief visual flicker when opening the plugin window while the transport was running at a buffer size below 64 samples, but audio remained uninterrupted. Apple Silicon users should expect the same reliability under Rosetta 2, though native ARM code is not yet on the roadmap.
What happens when you start a 134 BPM techno project from the default sine?
You start a new techno project in Ableton Live with a tempo of 134 BPM. The first thing you do is load KICK on a MIDI track and initialize the plugin to its default state — a pure sine sub with no click layers and all processing bypassed.
Step 1: Tune the sub. You play a C1 MIDI note and sweep the sub oscillator pitch until it feels like it sits naturally with the key you plan to write in, landing on D1. The pitch envelope depth gets a nudge to -24 semitones with a decay of 180 ms, giving the classic downward sweep that techno kicks rely on.
Step 2: Shape the click. You open the first click generator, select a noise sample from the onboard library that has a sharp initial burst, and set its decay to 45 ms. A second click layer uses a tonal sample pitched up an octave with a decay of 70 ms, adding a metallic tap at the very front of the sound. The third click slot stays empty for now.
Step 3: Apply processing. The EQ gets a 3 dB boost at 60 Hz and a narrow cut at 300 Hz to remove boxiness. The compressor follows with a 4:1 ratio, attack at 10 ms, and release at 80 ms, shaving off about 4 dB on the loudest hits. You switch the distortion to algorithm two — a soft-clip model — and drive it until the waveform just starts to flatten at the peaks. The limiter catches anything above -2 dB.
Step 4: Fit it in the mix. With a rumble bass and a closed hi-hat pattern already playing, you shorten the kick's overall amplitude envelope to 250 ms so the tail doesn't overlap with the bass reverb. A quick A/B against the raw sine confirms the click layers are doing their job; the kick punches through the hats without EQ clashes in the high mids. You save the patch and move on to arrangement.
Why does a huge solo preset vanish in the mix?
One common snag is a preset that sounds huge in solo but disappears in the mix. The culprit is almost always the click layers being too short and too quiet relative to the sub. Solo the click generators individually and check their peak level against the sub oscillator. If the combined click output is more than 6 dB below the sub, the attack gets buried the moment other percussive elements enter. Boost the click output gain or lengthen the decay slightly until the transient registers on the master bus meter.
Another issue shows up when the pitch envelope doesn't seem to respond. Check that the modulation depth is set to a negative value if you want the classic descending sweep; a positive value will pitch the sub upward, which can sound unintentionally rubbery. Also confirm that the sub oscillator's base pitch is set to the MIDI note you are actually playing — the pitch envelope works relative to that starting frequency.
Users occasionally report that the plugin doesn't appear in their DAW after installation. The .component file for AU belongs in /Library/Audio/Plug-Ins/Components/ and the .vst3 in /Library/Audio/Plug-Ins/VST3/. If you have moved your plug-in folders or are using a custom VST location in Ableton, rescan the directory. The standalone application installs to the /Applications folder and can serve as a quick check that the plugin installed correctly before troubleshooting the DAW.
If the UI flickers at low buffer sizes, increase your audio interface buffer to 128 samples or higher. The visual glitch is cosmetic and does not affect audio rendering or bounce quality. Rosetta 2 users on Apple Silicon may see slightly higher CPU readings than Intel-native hosts, but the plugin remains fully functional for tracking and mixing.
Kick 3 1.1.8 arrives with Sonic Academy's latest fixes and polish, smoothing out a handful of minor rough edges.
- macOS 10.13 or later
- Apple Silicon or Intel 64‑bit
Comments 0
Sign in or create an account to leave a comment.
No comments yet. A codec, a slice, a machine — they appear after moderation.
More in VST Plugins
cd ../ Sonarworks SoundID Reference
VST Plugins 718 MB
 Slate Digital Submerge
VST Plugins 38 MB
 Slate Digital Storch Filter
VST Plugins 69 MB
 Spire
VST Plugins 158 MB
 Slate Digital Murda Melodies
VST Plugins 179 MB
 Slate Digital Fresh Air
VST Plugins 40 MB
 Steinberg SpectraLayers Pro
VST Plugins 3.9 GB
 ShaperBox
VST Plugins 111 MB