
Supertone Air for macOS
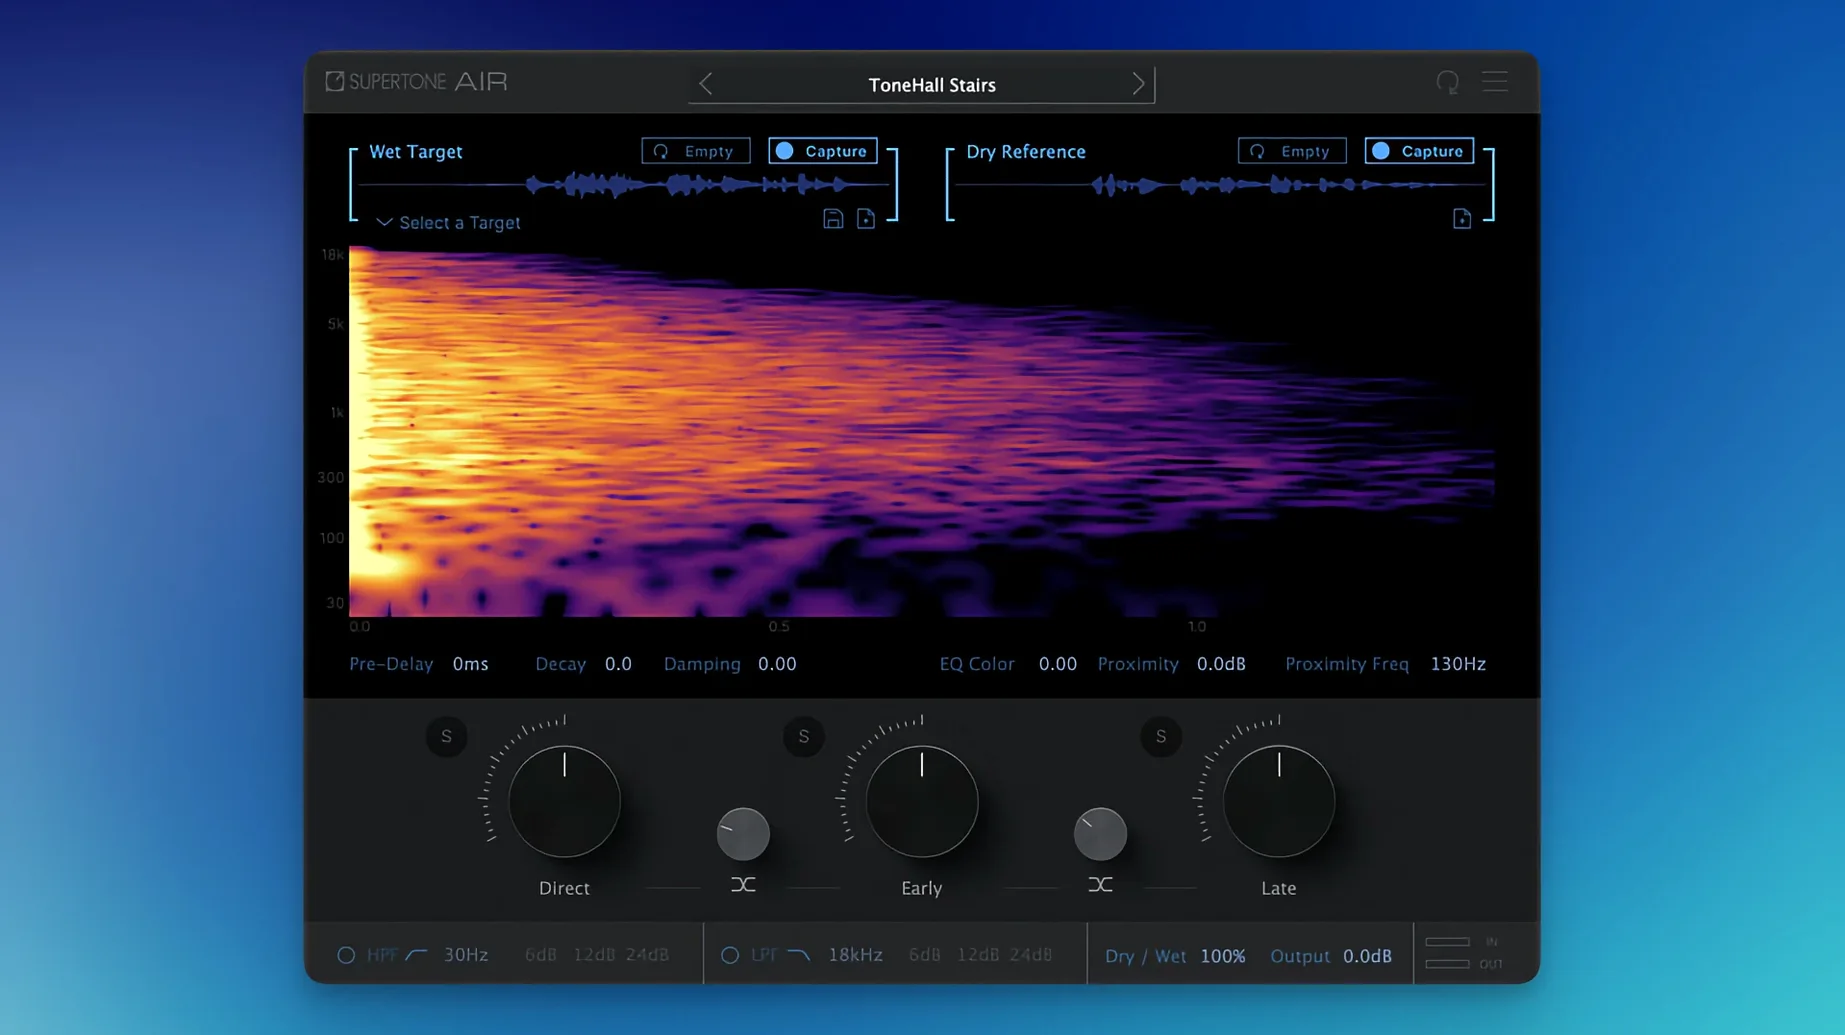
If you’ve ever nudged clip gain and fades in AudioSuite, you already know the offline processing mindset that Air plugs into. Supertone Air sits in that same Pro Tools AudioSuite slot, but it tackles the reverb and tonal mismatch between ADR and location dialogue. It captures a space from a reference clip and applies it to the new recording, combining decay, damping, and EQ in one pass.
- Process dialogue offline via Pro Tools AudioSuite—no real-time insert required.
- Capture a reverb fingerprint from a single production clip and export the profile as a
.wavfile. - Adjust decay, damping, and proximity to blend the matched space naturally.
- Balance direct, early, and late reflection levels so the voice sits correctly in the scene.
- Mix in spectral matching alongside the reverb, so the tonal color shifts toward the reference.
The plug-in is built specifically for 44.1 kHz, 48 kHz, and 96 kHz sessions and runs as a universal binary on Apple Silicon and Intel Macs. It doesn’t try to be a creative design tool—it’s a utility for making a clean studio line feel like it was recorded on set.
Stick to half-second room tone references
The first slip most people make is using too long a reference. You don’t need the whole line. Select a short section of room tone or a pause between words—about half a second to a second. A longer clip waters down the impulse response because Air averages the captured space. A tight, clean selection gives you a sharper fingerprint.
The second mistake is ignoring the direct signal level. Out of the box, Air's direct slider sits at unity, but beginners often pull it down thinking they want "more room." That leaves the dialogue feeling recessed. Keep the direct signal solid, then blend early reflections underneath for depth. The voice should still feel close-mic’d even when it’s living in the captured space.
Another common one: matching EQ and reverb on every single line independently. Air works best when you capture a scene’s acoustic signature once, save the profile, and apply it across multiple ADR cues. Changing profiles per line introduces subtle tonal shifts that draw attention to the edit. Consistency across a scene matters more than per-line perfection.
Finally, people forget that Air is an offline tool. Rendering a long clip with aggressive decay settings, then realizing you need to tweak it, costs time. Start with short preview selections—two or three seconds—before committing to the whole file. AudioSuite’s preview button is your friend here.
How does Air fit into a broader post-production workflow?
Air sits between the edit and the mix. After the dialogue editor has assembled the scene and spotted the ADR, Air runs as an AudioSuite render on the new lines. The processed clip then gets handed to the re-recording mixer, who can treat it like any other production track—no extra inserts, no real-time reverb plugin eating CPU on the dialogue stem.
It also works well alongside spectral editors like RX. If you’ve cleaned up a lav track or removed a noise print, Air can reintroduce the natural room tone that cleanup stripped away. The order matters: clean first, then match. Air’s spectral side benefits from a dry, noise-free source before it applies the reference EQ curve.
For mixers who print dialogue stems, Air profiles can stay in the session folder alongside the .ptx file. Exporting a profile as a .wav means the assistant can re-render a line weeks later without needing the original reference clip open. That portability matters on long-form projects where turnover happens between episodes.
Integration with macOS features
Because Air installs as standard AU, VST3, and AAX bundles, it respects macOS’s plug-in validation flow. After dropping the component into ~/Library/Audio/Plug-Ins/Components/ or the system-wide folder, the host DAW picks it up on next launch. On Apple Silicon, the universal binary loads natively without Rosetta, so AudioSuite renders stay fast even on long timelines. The profiles themselves are small—a few kilobytes of impulse data—so you can store them in iCloud Drive alongside project assets without bloating your session folder.
Build a labeled library from phone claps
Start by building a small library of your own spaces. Walk around your room with a portable recorder or your phone, grab three or four impulse-like claps, and capture them into Air. Label the profiles clearly: “small booth,” “living room corner,” “tiled bathroom.” These won’t replace on-set references, but they give you a sandbox for learning how decay and damping interact.
Next, run a comparison test. Take a dry ADR line, process it with Air using a location reference, then try to match the same result manually with an EQ and a convolution reverb on an insert. Listen to the tails. Air’s neural network tends to preserve the transient shape better than a static impulse response—especially on consonants—and hearing that difference early helps you decide when Air is the right tool.
Finally, check your AudioSuite handle length. Air needs a little extra tail beyond the clip boundary to render the full decay. Set your handle to at least two seconds in Pro Tools preferences before processing, or you’ll hear the reverb cut off abruptly at the clip end.
Match ADR to a concrete stairwell echo
Picture this: it’s late afternoon, and you’re spotting ADR for a drama scene shot in a concrete stairwell. The location track has that unmistakable slap-back echo, but the actor re-recorded their lines in a treated booth. You’ve got the reference clip open on a muted track—three seconds of room tone between two lines—and the dry ADR sitting on the target track below it.
You highlight the room tone in the reference clip, open Air from the AudioSuite menu, and hit Capture. The waveform display updates, and you hear the captured space in the preview. You save the profile as “Stairwell_Scene12.wav” into the session folder.
Now you select the first ADR region, switch Air to Render mode, and load the profile you just saved. You dial the decay back slightly—the stairwell was a little too live—and push the early reflections slider up to keep the voice present. Damping stays neutral; you want the hard surfaces to stay hard. You hit Preview and it sounds right. You render the selection.
You move to the next line, same profile, same settings. Render. Then the third line: the actor stepped closer to the mic, so you pull the proximity slider back a touch to match the distance. Render. Three minutes, three lines, and the scene feels like it was recorded on the day.
Before closing the session, you export the processed clips as new files with “_AIR” appended to the region names, so the mixer sees exactly what’s been treated. The profile stays in the folder for the next reel. That’s the rhythm Air fits into: capture once, apply with small adjustments, move on.
- The plug-in file was renamed from
AirtoSupertone Airto avoid conflicts. - Fixed an installer conflict that occurred when Sound Particles Air was already present on the system.
- macOS 10.13 or later
- Apple Silicon or Intel processor
- Pro Tools (AudioSuite host)
- Supports 44.1 kHz, 48 kHz, and 96 kHz sample rates
Comments 0
Sign in or create an account to leave a comment.
No comments yet. A codec, a slice, a machine — they appear after moderation.
More in VST Plugins
cd ../ Superior Drummer
VST Plugins 625 MB
 Synapse Audio The Legend HZ v2.0.2.R1
VST Plugins 472 MB
 Strymon Plugin Bundle
VST Plugins 427 MB
 T-RackS
VST Plugins 2.3 GB
 Steinberg SpectraLayers Pro
VST Plugins 3.9 GB
 Spire
VST Plugins 158 MB
 Sonic Academy KICK
VST Plugins 358 MB
 Sonarworks SoundID Reference
VST Plugins 718 MB